Preflop Range Map
6-max No-Limit Hold’em / 100BB effective stack / 2.5BB open
Preflop matrix
Every number here is a conceptual estimate (not solver output).
UTG open (raise first in)
- open
- fold
Whole range 16.1% (est.)
BB vs CO, SB vs BTN, BTN vs UTG, CO vs UTG keep the values from version 1 (their widths have not been re-tuned)
Tap a hand
Shows the action mix for each hand and the reason that hand is chosen.
Structure of this spot
The tightest position. With 5 players still behind you, both the chance of being 3bet and the chance of going multiway are at their highest. That is why offsuit Broadway hands (KJo, QJo) are the first to be cut, while suited A-x and connectors stay in. Hands that are hard to dominate and can make the nuts on the flop are preferred.
Wallpaper chart
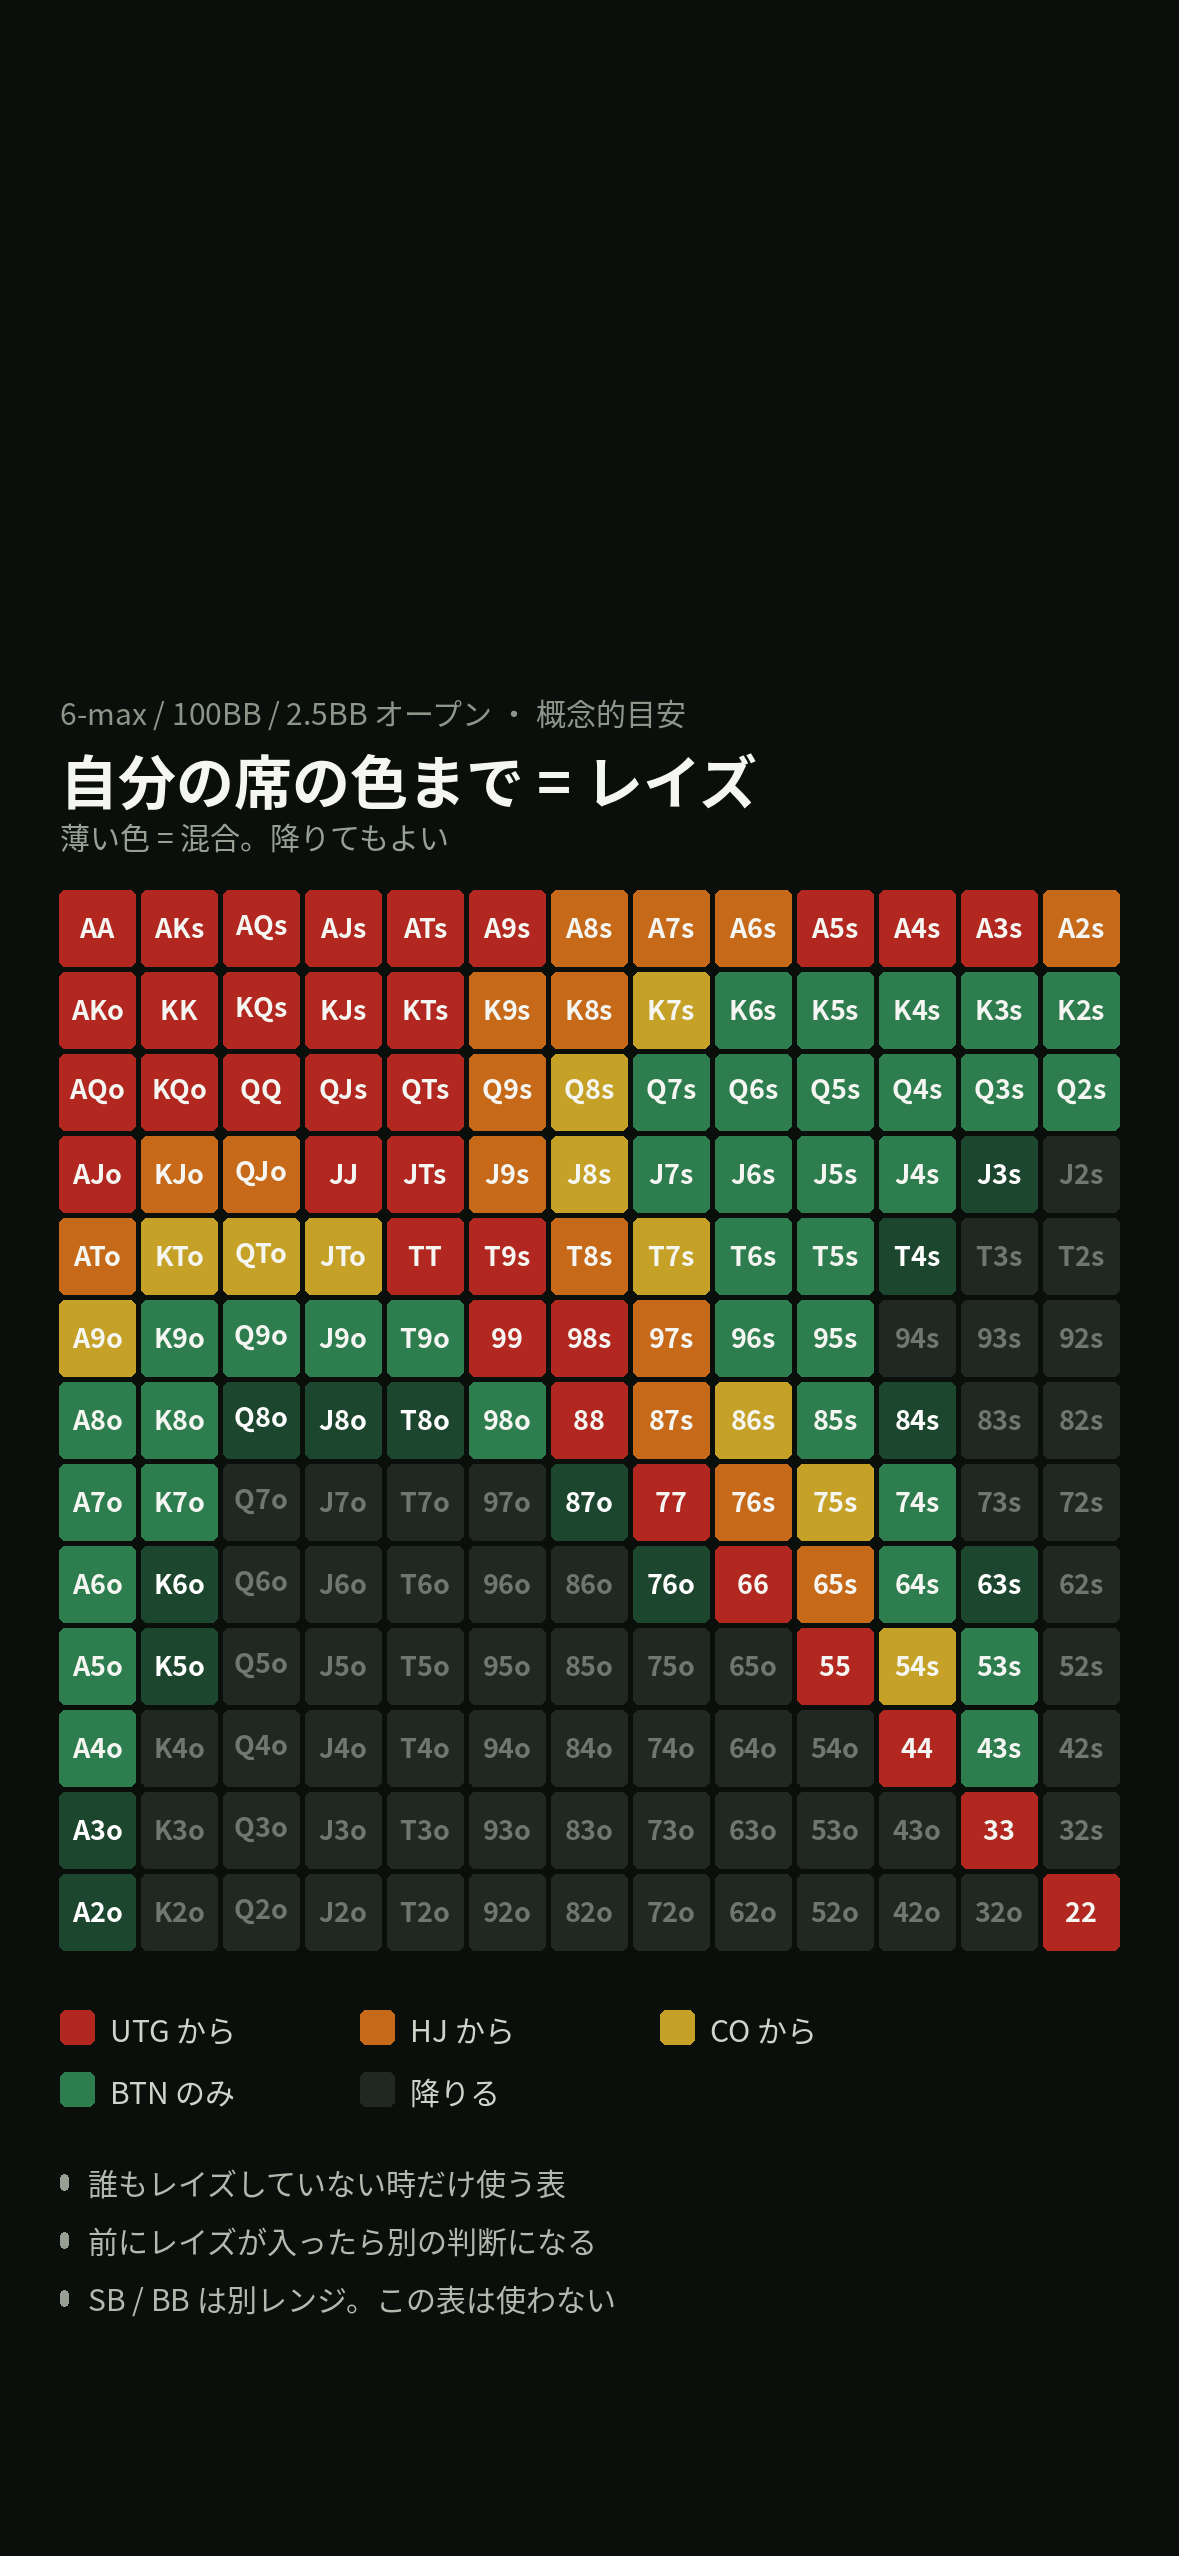
It is meant for the lock screen. As a home screen, the icons hide most of it.
The wallpaper uses its own color scheme (red, orange, yellow, green).
The labels on the wallpaper image are in Japanese.
Explanation
Wallpaper chart
- from UTG
- from HJ
- from CO
- BTN only
- light fill = mixed
- fold
Raise only with the color of your own seat and the darker colors
This is not a chart to memorize but a map to read. All the numbers are conceptual estimates, and the final check is the job of a solver.
What This Material Assumes
First, let’s be clear about how far this material can be trusted
The numbers are “conceptual estimates”
The frequencies here are not solver output itself. They are estimates derived from the structure of the ranges. Do not memorize decimals such as “A8s is 50%” as they are.
What you can trust is the structure
The order in which ranges widen as your position gets later, why suited hands have the edge, and how the A blocker works. These do not change under any settings.
What needs checking
The SB strategy (a mix that includes limping), the BB defense width, and the mixed frequencies of 4bets. Rake and the pool have a large effect, so these need re-checking for each stake you play.
There is no system that wins every time in poker. The goal is maximizing long-term EV.
How to Read the 13×13 Chart
All 169 combinations folded onto 1 sheet. First, learn this layout by heart
BTN open (raise first in)
- open
- fold
Whole range 47.6% (est.)
Layout
- The diagonal = pocket pairs. 6 combos each
- Upper right = suited. 4 combos each, 23.5% of the total
- Lower left = offsuit. 12 combos each, 70.6% of the total
Height of the color = frequency
- The share filled from the bottom is the frequency of that action
- Fully filled = almost always that action
- Only half = mixed. Either is fine
Where to look first
- Not the top-left corner (the strong hands) but the color boundaries
- Once you can explain why each boundary is there, you no longer need the chart
Example: the BTN open range. You can see that almost all suited hands are in, and the line is drawn among the offsuit hands.
Why Ranges Change with Position
The number of players left behind you decides how wide a range of hands you can play
Open frequency (est.)
① Chance of being 3bet
- If you open from UTG, 5 players are waiting behind you
- If even 1 of them 3bets, you are at a disadvantage
② Chance of going multiway
- The more players join, the less one pair is worth
- That is why early seats keep hands that can make the nuts
③ Equity realization
- With position, the chance of winning the pot goes up
- This difference is why the range doubles on the BTN
How to Use the Wallpaper Chart
In pots where nobody has raised, you play up to the color of your own seat
Wallpaper chart
- from UTG
- from HJ
- from CO
- BTN only
- light fill = mixed
- fold
Raise only with the color of your own seat and the darker colors
How to read it
- Darkest red = from UTG / dark red = from HJ / middle red = from CO
- Light red = BTN only. Gray = fold
- Raise only with the color of your own seat and the darker colors
- Light fill = mixed. When in doubt, you may fold
When not to use it
- Someone before you has raised (it is for opens only)
- You are in the SB / BB (a different range applies)
- Your stack is far from 100BB
Keep fixed
The open size is 2.5BB. Do not change it from hand to hand
Changing the size from hand to hand is itself information for your opponents.
UTG open range
The tightest seat / 16.1% of all hands (est.)
UTG open (raise first in)
- open
- fold
Whole range 16.1% (est.)
Conclusion
- Pocket pairs center on 55 and above. 22-44 are mixed
- Suited A-x stays in down to A2s
- Offsuit goes up to AJo and KQo (ATo, KJo and QJo are mixed)
Reasons
- 5 players behind you. You face the most 3bets and multiway pots
- A5s and 98s, which can make the nuts, come before KJo
- Not the kicker, but blockers and playability
Common mistakes
- Opening A9o and ATo “because it has an A”
- Believing KJo is a strong hand
HJ open range
Widens by only 1 player / 21.6% of all hands (est.)
HJ open (raise first in)
- open
- fold
Whole range 21.6% (est.)
Conclusion
- 22+ and A2s+ are in (A6s-A8s are mixed)
- 1-gap hands such as K8s, Q9s and J9s are unlocked
- KJo is added, and QJo is added as mixed
Reasons
- 4 players are left behind you, and your positional advantage grows
- Equity realization improves and the threshold for playing drops
- It widens in a way that “adds hands that can fight even when weak”
Common mistakes
- Using the UTG range as is and throwing away chances
- Or the opposite: opening as if from the CO and getting crushed by 3bets
CO open range
From here you switch to the attacking side / 28.6% of all hands (est.)
CO open (raise first in)
- open
- fold
Whole range 28.6% (est.)
Conclusion
- Suited hands go down to K7s, Q8s, J8s and T7s
- Suited connectors are all included down to 54s
- Offsuit: A9o+, KTo+, QTo+ and JTo
Reasons
- Only the BTN and the 2 blinds are left
- A5o is in for the wheel and the blocker
- Not the kicker, but “what can you make on the flop?”
Common mistakes
- Opening as wide as the BTN (the BTN is still behind you)
- Overrating suited hands. A flush completes by the river only about 6% of the time
BTN open range
The most valuable seat / 47.6% of all hands (est.)
BTN open (raise first in)
- open
- fold
Whole range 47.6% (est.)
Conclusion
- Almost all suited hands (down to K2s and Q2s)
- Offsuit also widens to A2o, K6o, Q9o and J9o
- Only here do you open close to half of all hands
Reasons
- 2 players are left. You have position on every street
- The standard is “can you go after the 1.5BB on favorable terms?”
- Even when weak, you have both ways to make them fold and ways to fold yourself
Common mistakes
- Opening wide, then folding everything to a 3bet
- Letting the width drag your postflop play loose as well
SB open range
Wide, but the hardest seat / 40.1% of all hands (est.)
SB open (raise first in)
- open
- fold
Whole range 40.1% (est.)
Conclusion
- With only the BB, 1 opponent, the numbers make it wide
- But postflop you are always out of position
- Solvers use a mixed strategy that includes limping
Reasons
- The reason you can win is “only 1 opponent”; the reason you lose is being OOP
- The boundary is where these 2 balance out
- A5o and A4o are opened heavily because of the blocker and the wheel
Common mistakes
- Opening as if on the BTN and getting pushed around over and over
- Writing off a limp as “a weak action”
The 3 Choices After Someone Raises
Which axis separates fold, call and 3bet?
3bet
The top of your range, and the low end that holds blockers. The middle is not used. This shape, split into value (QQ+ / AK) and bluffs (A5s-A2s), is called polarized.
Order of judgment
- The opponent’s position (= how strong the opponent’s range is)
- Your position (who acts first)
- The number of players left behind you (the risk of a squeeze)
Call
Hands too weak to 3bet that can still fight on pot odds and implied odds. Make it thicker the more position you have, and thinner the more players are left behind you.
Shapes to remember
- The stronger the opponent, the higher your value threshold
- Narrow your bluffs to hands that hold blockers
- The same hand plays a different role in each spot
Fold
Hands that get dominated belong here. KJo and A9o may look like calls by pot odds, but it is exactly when they hit that they are often in a losing shape (when the BB defends against a BTN open, these go into the call, because it can get in cheaply).
BB vs BTN open
3bet 12.0% / call 31.4% (est.)
BB facing the BTN’s 2.5BB open (calling 1.5BB into a 4BB pot before the call, about 2.7:1)
- 3bet
- call
- fold
Whole range 43.4% (est.)Breakdown (est.): 3bet 12.0%, call 31.4% (overlap adjusted on the call side)
■ Purple = 3bet ■ Green = call ■ Gray = fold
Conclusion
- The seat that can call most cheaply. Many hands do not fold
- The 3bet centers on 99 and above, AJs and above, KQs, AQo and above, and A5s-A2s. Other suited hands and connectors are added as a mix
Reasons
- The BTN is as wide as 47.6%, so the value threshold also drops
- But you are always OOP. After calling, you are easily attacked
Common mistakes
- Calling with everything down to K3o “because it is cheap”
- Always 3betting halfway hands (KJo, A9s) (the baseline mixes 3bet and call)
BB vs UTG open
3bet 5.5% (est.) / calls are cut sharply too
BB facing the UTG’s 2.5BB open
- 3bet
- call
- fold
Whole range 20.2% (est.)Breakdown (est.): 3bet 5.5%, call 14.7% (overlap adjusted on the call side)
■ Purple = 3bet ■ Green = call ■ Gray = fold
Conclusion
- The opponent has the strongest range. The 3bet centers on QQ+ and AK
- Bluffs are concentrated on A5s and A4s
Reasons
- UTG opens only 16.1%. You can only stand up to it with the top of your range
- A5s can fight while reducing the opponent’s AA and AK
Common mistakes
- Calling with A9o / always calling with KJo (the baseline mixes the KJo call)
- Building the same 3bets as against the BTN and getting crushed by 4bets
BTN vs CO open
3bet 9.4% (est.) / you can hold a thick calling range
BTN facing the CO’s 2.5BB open
- 3bet
- call
- fold
Whole range 19.5% (est.)Breakdown (est.): 3bet 9.4%, call 10.1% (overlap adjusted on the call side)
■ Purple = 3bet ■ Green = call ■ Gray = fold
Conclusion
- You can call while keeping position
- That is why the calling range gets thick
Reasons
- You act last, so you realize your equity more easily
- In the 3bet, A5s-A2s are the bluffs and TT+ is the value
Common mistakes
- Forgetting the blinds’ squeeze and getting loose
- Sticking with calls instead of 3betting more, even in a pool that squeezes often
Why A5s Is Used as a Bluff
Not “because it is strong” but “because it reduces the opponent’s strong hands”
6 → 3
The opponent’s AA is cut in half
Just by holding 1 A yourself, the combinations of AA the opponent can hold drop from 6 to 3
16 → 12
The opponent’s AK goes down too
There are 16 combos of AK, but the A blocker cuts them to 12. Fewer strong hands that will not fold
30.2%
It can fight even when it cannot make them fold (calculated against QQ+ and AK)
Even when called, equity remains from its nut flush potential and its A2345 straight potential
The 4 conditions for choosing A5s
- Blocker: directly reduces the opponent’s value
- Equity: keeps a chance to win even when the opponent does not fold
- Playability: can be played from the flop on
- Nuts potential: becomes one of the strongest hands when it hits
That is why 76s plays a different role from A5s
- It has straight potential, but cannot reduce the opponent’s hands
- Putting 76s into the 3bet is part of a mix, with no blocker role
- This difference is where memorizing and understanding part ways
Can You Explain the Hands on the Boundary?
The closer a hand is to the edge of the chart, the better practice it is for putting reasons into words
KJo The classic hand you must not call with against a raise from an early seat. It is dominated by the opponent’s AJ, KQ and AK, and even when it hits a K or a J it is often behind. It is good enough for an open from the BTN.
A9o It looks strong because it has an A, but when you call, almost every A the opponent holds is higher (AT-AK). The textbook case of reverse implied odds: it loses the most exactly when it hits.
76s Weak on its own, yet you open it with confidence from the CO and BTN. It reaches both straights and flushes, and can make nuts that the opponent’s range does not hold. It is not used as a 3bet bluff.
Practice: pick 1 hand on the edge of the chart and explain out loud, in 30 seconds, why the boundary is there.
4bet and 5bet
At 100BB, once you 4bet you are close to “fold or put everything in”
4bet: the size decides the structure
- IP: 2.2-2.5 times. You can make them fold cheaply, so bluff more
- OOP: 2.5-3 times. Polarize more
- Value is QQ+ and AK, bluffs are A5s-A2s
Common mistakes
- Building a 4bet bluff with a hand that has no blocker (76s)
- 5betting AK when the opponent does not 4bet bluff
- Calling a 5bet after you 4bet
5bet: effectively all-in
- At 100BB, 5bet bluffs hardly exist
- An A5s that 4bet should, as a rule, fold to a 5bet
- The range centers on QQ+ and AK. JJ and AQs depend on the opponent
Order of thinking
- What is the opponent’s 3bet range?
- What does your 4bet want to make fold?
- Decide in advance whether you fold or get it in when 5bet
Separate Memorizing, Understanding and Judgment
Even within the same chart, 3 kinds of information of different natures are mixed
What to memorize
The 13×13 layout, and the range width for each position (16.1 / 21.6 / 28.6 / 47.6 / 40.1). These need to come out as a reflex.
What to understand
“Why the boundary is where it is.” Being able to explain in your own words why A5s is in and A9o drops out.
What to judge by situation
The mixed cells. These are places where we see little difference whichever you choose (an estimate, not solver output), so you may simply pick one to suit the opponent.
What to do next
-
- Be able to state the range width for each position as numbers, not as hands
-
- Explain in 30 seconds why the boundary hands (KJo, A9o, K5s, 54s) are on the boundary
-
- Picture the opponent’s range in your head in the same 13×13 form as your own
-
- Only with those 2 ranges in hand, move on to talking about the flop